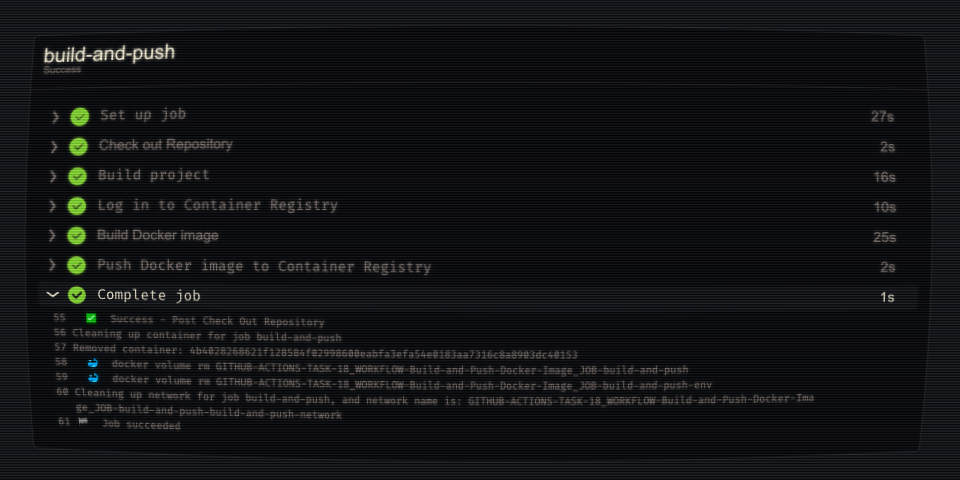
Websites need to be continuously update in order to be alive for your customers or partners. Deploying site modifications is a repetitive task, requiring several steps with possible errors, hence requiring to check every steps. It can be a time consuming task over time, furthermore this task has no added value and can be quite boring for the professionals able to perform it. In order to save professional’s time for more added value tasks, I have fully automated this process from A to Z.
If you’re interested in our cause? Or in this project, join me on this fantastic journey to the heart of automation.
Introduction
Here’s a sequence diagram to illustrate our automated process.
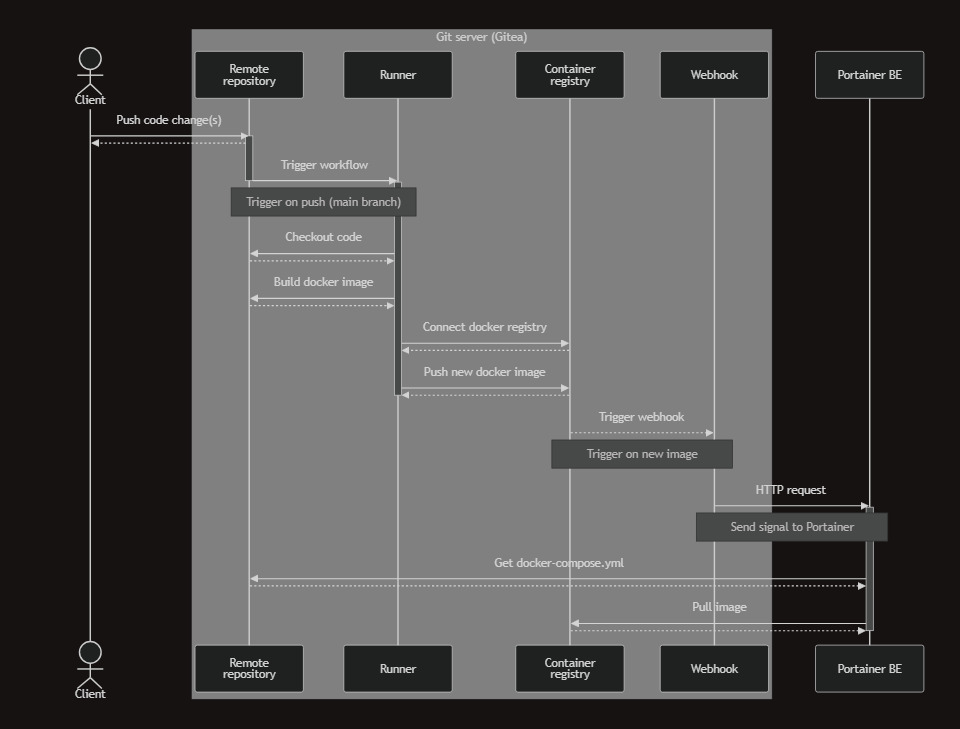
- First, a user will push new code changes
- This push will trigger a “workflow”
- The workflow will mainly be:
- Checkout our Repository
- Build a docker image
- Push it into our container registry
- the newly added image will trigger webhook and send HTTP request to Portainer
- Portainer will create a container with our image and a configuration file (
docker-compose.yml)
Recommended
HINT: For this project I recommend you to have a web project you want to automate (hosted on a git server like Gitea or Github), but you can also use this article as help for you own automation project.
To follow this article correctly, it is advisable to have knowledge of the following subjects:
- Docker (CLI, Dockerfile, image, container, registry)
- Docker Compose (CLI, YAML)
- Git (commit, push, pull, etc.)
- Gihub Actions (YAML)
- Github/Gitea
- Portainer BE
Docker
The first step is to create your Dockerfile to create your image. The dockerfile is different for each project, so you’ll need to create yours according to your project. But I’ll help you a little by sharing mine, currently used for this blog:
INFO: My blog use the web framework Astro.
# First part
FROM node:21.7.0-alpine AS build # select base image to use for build
WORKDIR /app # set the workdir
COPY package*.json pnpm-lock.yaml ./ # copy packages files
RUN npm install -g pnpm # execute command
RUN pnpm install --silent # execute command
COPY . .
RUN pnpm run build

# Second part
FROM nginx:alpine AS runtime # select nginx image for runtime
COPY ./nginx/nginx.conf /etc/nginx/nginx.conf
COPY --from=build /app/dist /usr/share/nginx/html
EXPOSE 8080
As you can see, this Dockerfile has 2 parts, one for building and one for running. The first part will install all the dependencies of my projects and all the files it will need to build the web files. The second uses my nginx configuration and uses the build from the previous part.
TIP: You can find the complete nginx configuration here.
TIP: Use a
.dockerignorefile to not copy unused files# Ignore NodeJS modules folder and log file node_modules npm-debug.log # Ignore Docker File Dockerfile .dockerignore # Ignore Git file and folder .git .gitignore # Ignore dist folder dist
Test
Test your docker image by running this in your terminal (in project dir):
docker build -t <name> .replace
<name>by what you want.
Gitea/Github workflow
For this part you can use Github or Gitea. For my part, I used Gitea which I self-hosted and configured my own runner.
I can assure you that using Gitea actions is very similar to using Github actions, the only major difference being that most elements named gitea will have to be replaced by github (example: .gitea/workflows will be .github/workflows).
First create this file /.gitea/workflows/deploy.yml.
Then we’ll create our Gitea workflow, which will build our docker image and push it to the Gitea container registry. In my case, the image is built every time I push it to my main branch:
name: Build and Push Docker Image

on:
  push:
    branches:
      - main

jobs:
  build-and-push:
    runs-on: ubuntu-latest
    permissions:
      contents: read
      packages: write
    steps:
      - name: Check Out Repository
        uses: actions/checkout@v4

      - name: Build Project
        run: |
          npm install -g pnpm
          pnpm install --silent
          pnpm run build

      - name: Log in to Gitea Container Registry
        uses: docker/login-action@v3
        with:
          registry: gitea.koalhost.duckdns.org
          username: ${{ gitea.actor }}
          password: ${{ secrets.PASSWORD }}

      - name: Build Docker image
        run: |
          ACTOR_LOWER=$(echo ${{ gitea.actor }} | tr '[:upper:]' '[:lower:]')
          BRANCH_NAME=$(echo ${{ gitea.ref_name }} | tr '[:upper:]' '[:lower:]') # Get the branch name in lowercase
          docker build -t "gitea.koalhost.duckdns.org/$ACTOR_LOWER/koalhack-blog:$BRANCH_NAME" .

      - name: Push Docker image to Gitea Packages
        run: |
          ACTOR_LOWER=$(echo ${{ gitea.actor }} | tr '[:upper:]' '[:lower:]')
          BRANCH_NAME=$(echo ${{ gitea.ref_name }} | tr '[:upper:]' '[:lower:]') # Get the branch name in lowercase
          docker push "gitea.koalhost.duckdns.org/$ACTOR_LOWER/koalhack-blog:$BRANCH_NAME"
INFO: You can see that in the workflow I put the
gitea.actorin the lower case because if it contains a capital letter it won’t work, and the same goes for the branch name.
INFO: In the workflow I also put
secrets.PASSWORD, you will have to define it in your Gitea secrets/Github secrets web interface.
This file is divided in 5 parts
- In the first one we use the checkout action to verify if we can access the repository
- The second build the project to verify if we have any build error before building Docker image
- The third use the docker login action to login to my local Gitea container registry
- The fourth build the docker image using the
Dockerfile - To finish the fifth push the freshly build docker image to our Gitea container registry
TIP: to test your Gitea/Github workflows I recommend using the act project. With this CLI tool, you can run your workflow locally.
Docker Compose
It’s time to create your docker-compose.yml file:
services:
  app:
    image: gitea.koalhost.duckdns.org/koalhack/koalhack-blog:main
    restart: always
    ports:
      - '4242:8080'
This little file will pull our image from the container registry and make a container from this image available on port 4242.
Portainer
INFO: to use Portainer you will need to have the Business Edition, you can have a free license here (limited to 3 nodes).
- Begin by creating a stack
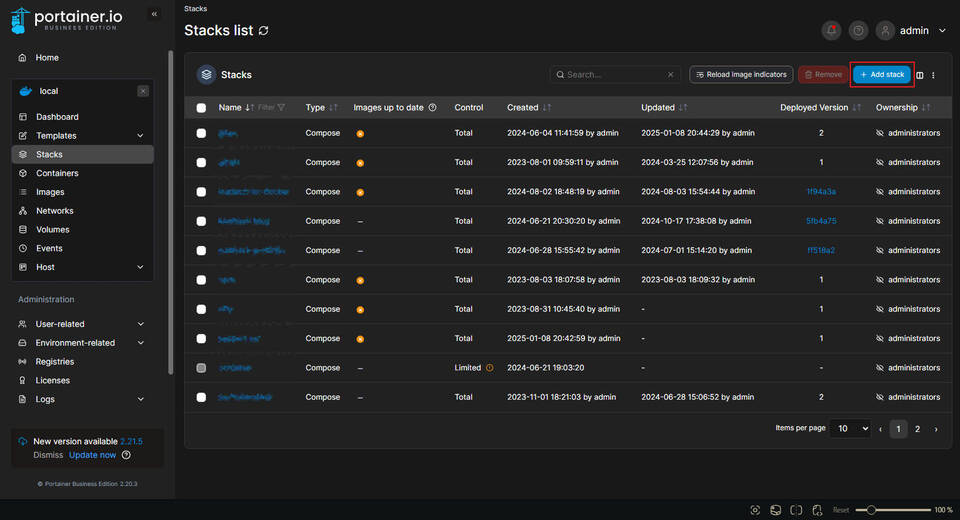
You can name your stack as you wish.
-
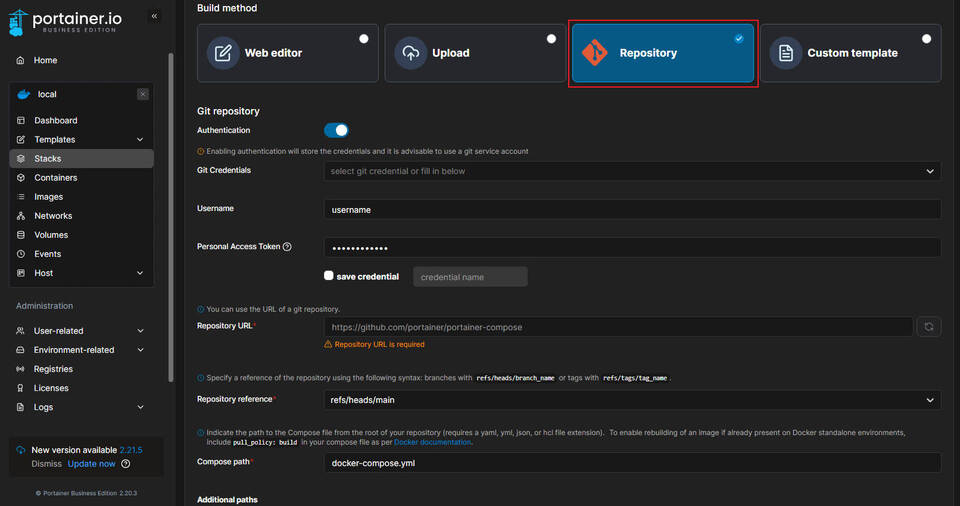
In Build method select “Repository” and insert your Github/Gitea authentification credentials (if needed)
-
Insert the URL of your repository
-
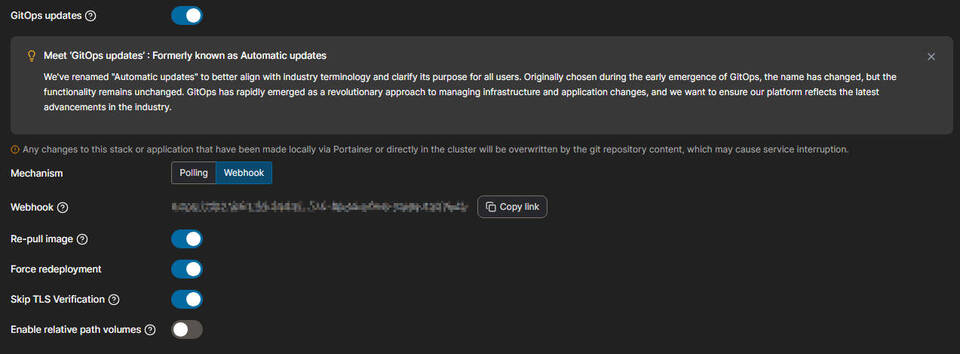
Activate the toggle switch named GitOps
-
Set the Mechanism field to “Webhook”
-
Activate the Re-Pull image and Force Redeployment toggle switches
-
Copy your Webhook link for futur use
-
Click on deploy stack button at the bottom
INFO: check the option
Skip TLS Verificationif you encounter issues.
Gitea/Github
INFO: In this section I only show the process for Gitea, but the process is very similar for Github.
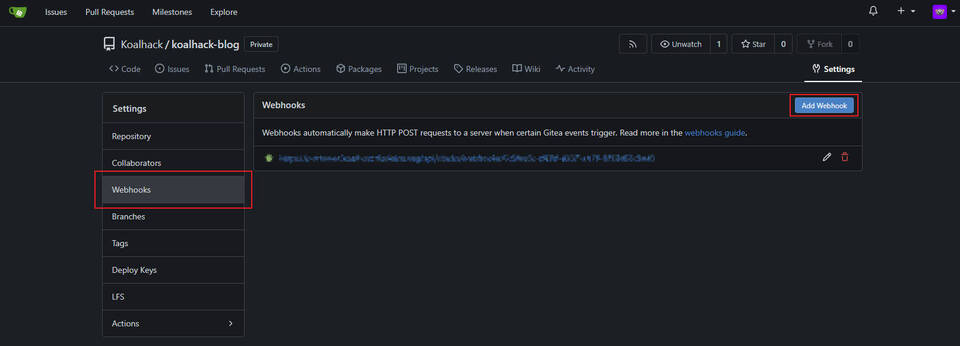
- Go to your Git project settings

- In Webhook section click on Add Webhook button
-
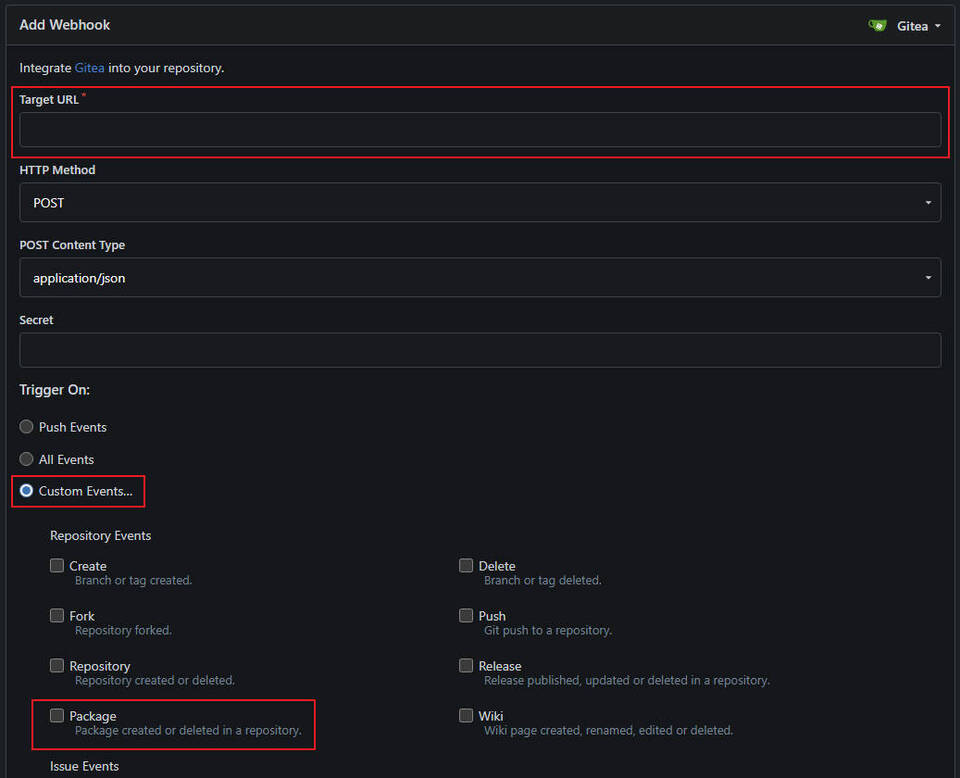
In the form field, paste the Portainer webhook URL previously copied in the Target URL field
-
In Trigger on option select “Custom Events…” and in “Repository Events” check “package”
-
Click on Add Webhook button at the bottom
Conclusion
If you have followed this article correctly, you should now have a fully automated deployment system. I hope you enjoyed it.
